Integrating with Microsoft Active Directory Federation Services (AD FS) is a great way to provide the Single Sign-On experience to your Mediasite Users.
Setting up SSO with AD FS in Mediasite
1. Determine User and Group Attributes
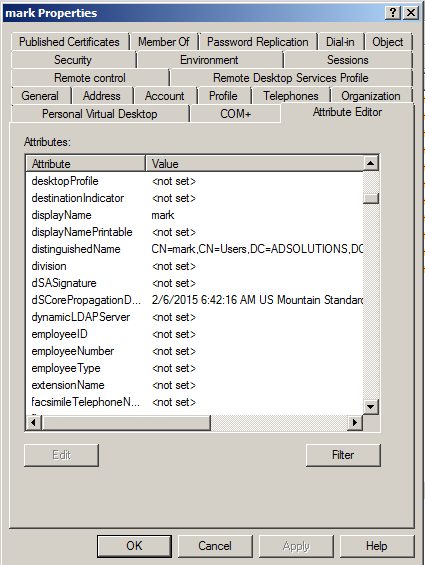
When configuring the AD FS integration, it is helpful to have access to the Attribute Editor within the Active Directory Users and Computers application. This tool will all you to view the user and group properties (e.g. User ID, Display Name, Email) that are required by Mediasite. A full list of attributes supported by Active Directory can be found at this Microsoft site.
2. Discovering the Claim Type Properties for ADFS
When working with ADFS, user properties are sent to Mediasite using Claims. At its most basic level, Claims are simply statements made about the user. After you know the User Attributes in use (e.g. Name, E-Mail), you will need to know the URI Value that ADFS uses for the given attribute.
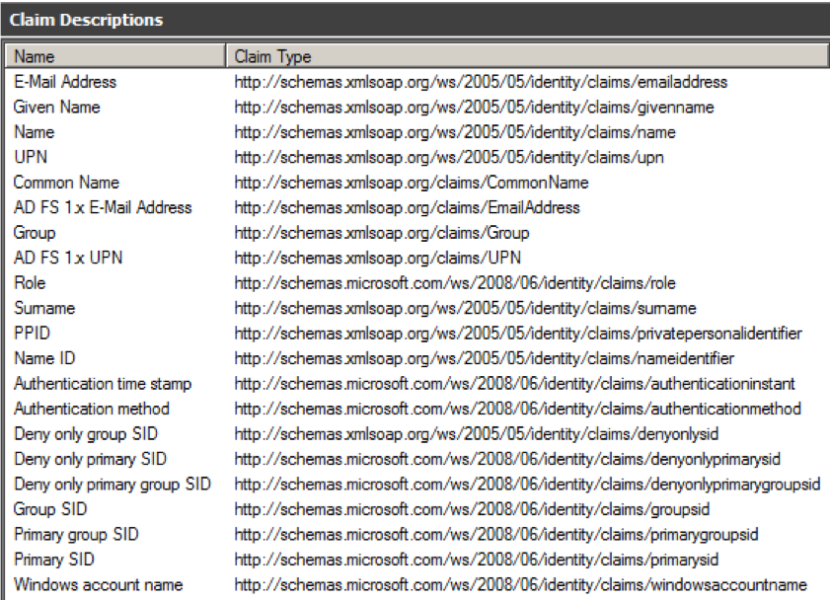
Below are a few of the most common pairings
- Name: http://schemas.xmlsoap.org/ws/2005/05/identity/claims/name
- E-Mail Address: http://schemas.xmlsoap.org/ws/2005/05/identity/claims/emailaddress
- User Principal Name (UPN): http://schemas.xmlsoap.org/ws/2005/05/identity/claims/upn
A full list of supported ADFS Claims can be found on Microsoft’s website.
3. Configure Mediasite to Connect to Active Directory Federation Services (ADFS)
Instructions:
- Browse to the Management Portal
- Click: Security > SAML 2.0 Configuration
- Complete the form using suggested values listed in the table below.
- Click: Save
Service Provider Settings
| Field | Sample Value | Notes |
|---|---|---|
| Entity ID | https:// | e.g. http://mediasite.company.com/mediasite. Typically, this is the URL of your server or some other unique name. |
| Use the NameID in the Assertion Subject as the UserID | Checked | Use the NameID in the Assertion Subject as the UserID – If you do not want to release a separate attribute to uniquely identify a user, you can enable this option. This tells Mediasite to check the IdP assertion subject for the Name Identifier (NameID), and use that as the UserID instead. If you are using ADFS 2.0, select this option. Use an attribute in the Assertion as the UserID – This allows you to manually specify both the UserID attribute name and name format if selected. |
| Role Attribute Name | http://schemas.microsoft.com/ws/2008/06/identity/claims/role | Attribute used for retrieving security Roles from ADFS. |
| Role Attribute Name Format | This field should be left blank. | |
| Automatically create User Profiles on Login to My Mediasite or Management Portal | Enabled | Available in 7.0.26+, this will automatically create new user Profiles for Management Portal and My Mediasite users. |
| Display Name Attribute Name | http://schemas.xmlsoap.org/ws/2005/05/identity/claims/name | |
| Display Name Attribute Name Format | This field should be left blank. | |
| Email Address Attribute Name | http://schemas.xmlsoap.org/ws/2005/05/identity/claims/upn | Assumes UPN is being passed through claim rule as email address. We have seen issues with other customers passing the actual email address attribute in the claim rules. |
| Display Name Attribute Name Format | This field should be left blank. | |
| Metadata URL | N/A | Once valid SAML 2.0 Configuration settings have been saved, this URL should reflect the generated metadata. You will send this URL to your ADFS administrator. |
| Cache Duration (Minutes) | 1440 | The length of time the SP will keep metadata and roles cached. The default is 1440 minutes (24 hours). |
| Certificate Source | Mediasite Self-Signed Certificate | Use the self-signed certificate unless the you have a requirement that a signed cert is used. |
| Signing/Encryption Key Length | 1024, 1536, 2048, 3072 or 4096 | Get this value you’re your ADFS Administrator. This must match the length of the SSL certificate on the IdP. |
| Signing Hash | SHA-1 or SHA-256 | Most likely SHA-256 |
Expiration Duration
| Field | Sample Value | Notes |
|---|---|---|
| Current Expiration Date | This displays the date when the current metadata is no longer valid, and must be refreshed. This is automatically generated from the Expiration Duration setting. | |
| Expiration Duration | 1 Years, 0 Days | The time in years and days the SP metadata will be valid. Save the Configuration Page so that the Current Expiration Date is populated. |
Identity Provider Settings (AKA ADFS)
| Field | Sample Value | Notes |
|---|---|---|
| Entity ID | http:// | Get this value from the ADFS Administrator, or you can get it from the entityID field within the IdP’s metadata URL (See next row for details) This is the identifier of the IdP, and must be globally unique. The value may look like: http://adfs.company.com/adfs/services/trust |
| Metadata URL | https:// | Get this value from the Administrator. It may have a URL similar to: https://adfs.company.com/ FederationMetadata/2007-06/FederationMetadata.xml If your metadata has to be located somewhere that is not accessible by the Mediasite SP, then you must manually copy it to a location that the SP can reach. |
| Display Name | ADFS | Pick a friendly name that will display on the login page (e.g. ADFS) |
| Automatically Redirect to provider during login | Checked | When checked, the user will be redirected to your corporate ADFS login page. When unchecked, all users will be directed to the standard Mediasite login form. This is useful for troubleshooting purposes. |
4. Configure ADFS
After Mediasite is configured, your AD FS administrator will need to be involved to complete the configuration. The instructions below are meant to be a basic guide. Please refer to your server documentation for the latest documentation.
- Browse to the Management Portal
- Click: Security > SAML 2.0 Configuration
- Complete the form using suggested values listed in the table below.
- Click: Save
Add a new Relaying Party Trust
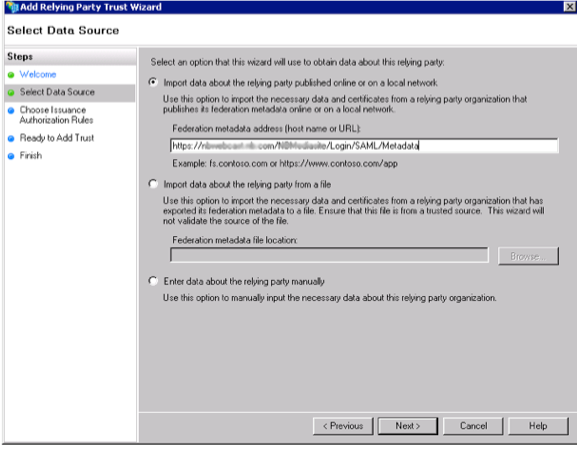
- Start the ADFS Administration Tool
- Browse to: Trust Relationships > Relaying Party Trusts
- Click: Add Relaying Party Trust
- Select: Import data about the relying party published online or on a local network
- Enter the metadata URL of the Mediasite server that was provided in the Mediasite Management Portal: https://<Mediasite_Server>/<site>/Login/SAML/Metadata
- Specify the Display Name: Mediasite
- Choose Issuance Authorization Rules: Permit all users to access relaying party
- Confirm Settings
Verify Relaying Party Trust Endpoints
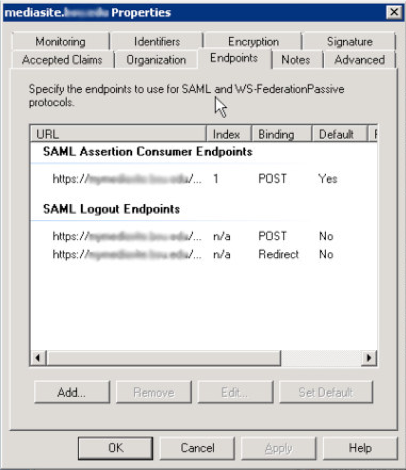
- After the claim rule has been setup, verify that ADFS has been able to import the Mediasite endpoints through Mediasite metadata XML file.
- Edit Properties for Relying Party Trust
- Select Endpoints
- System should show 3 different endpoints
- 1x SAML Assertion Consumer Endpoints
- 2x SAML Logout Endpoints
- If Mediasite is not running over SSL, some ADFS integrations may not pick up the endpoints. This will cause the login process to fail.
Edit Claim Rules Security
- In the advanced tab of the Relaying Party configuration screen, verify the type of security being used, SHA-1 or SHA-256. If running 7.0.24+, SHA-256 can be used. Earlier versions of Mediasite must use SHA-1.
Edit Claim Rules to Pass Attributes to Mediasite
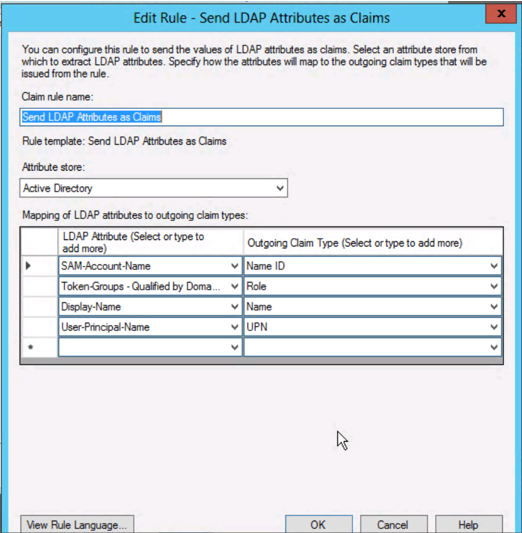
- Click: Edit Claim Rules
- Click: Add Rule…
- Choose Rule Type: Send LDAP Attributes as Claims
- Set up the Claims to allow ADFS to pass attributes to Mediasite.
Some common values are listed below:
| LDAP Attribute | Outgoing Claim Type |
|---|---|
| SAM-Account-Name | Name ID |
| Token-Groups - Qualified by Domain Name | Role |
| Display-Name | Name |
| User-Principal-Name | UPN |
5. Update the Mediasite Login Form
After you have completed the SAML 2.0 Configuration form, you must update the Mediasite Video Platform to use the SAML based login form.
Self-Hosted Mediasite Video Platform
From within the Configuration Editor on the primary Web/Application server (e.g. http://localhost/mediasite/configure), update the login form to: https://<<MEDIASITE_SERVER>>/mediasite/login/SAML
Mediasite Cloud
Open a support case asking for the updates to be made.
6. Test
After Mediasite and AD FS have been configured, you can begin testing the integration. To test the integration, perform the following steps:
- Open a new web browser
- Browse to the Mediasite Management Portal (e.g. http://mediasite.company.com/mediasite/manage).
- You will be redirected to your enterprise ADFS login page. Enter your user credentials.
- The Mediasite Management Portal of My Mediasite portal should display.
- If you receive an error, the integration is not configured properly.
- If you are prompted to complete your User Profile by entering your Name, Email and Time Zone, the User Profile Provisioning is incorrectly configured.


