Mediasite Recorder (RL1020A)
Your Mediasite Recorder is a lightweight rack mountable recorder. It offers a perfect solution to recording dual streams, either dual video or video and slides. With the simplified design of the Recorder, connecting your input devices should take the guesswork out of what to connect where.
The below diagram is labeled to help you identify how to connect devices to your recorder. The most commonly used ports are listed in bold.

- P-1 – Power cable – The power cable supplied with the recorder plugs in to a standard wall outlet.
- P-2 – USB ports – The USB ports can be used for a keyboard or mouse if you choose to connect them to your recorder.
- P-3 – Network – Used for connecting the recorder to the Mediasite server for publishing content.
- P-4 – DB9 Connection – Used to connect a room control system.
- O-1 – Display port – This port is an output that can be used to connect a monitor to the recorder.
- O-2 – HDMI port – This port is an output that can be used to connect a monitor to the recorder.
- O-3 – 3.5mm Audio line out – Connect headphones or speakers so you can monitor audio directly from the recorder.
- I-1 – 3.5mm Audio line in – While this can be used to connect a microphone it is not recommended. This port is rarely used.
- I-2 – HDMI – The HDMI ports can be used for video, audio and or content.
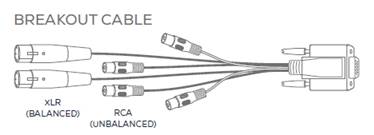
- I-3 – XLR/RCA Breakout cable input – Audio inputs are connected to the breakout cable which is plugged in to the recorder here.
For more details on setting up and configuring your recorder use:
Was this Information helpful?
Let us know if you found this lesson helpful. That’s the only way we can improve.


